How to teach converging-lens image formation with ray diagrams
For a converging lens, object position relative to the focal length determines the image. Trace two principal rays before showing the calculation: outside the focal length gives a real inverted image, while inside it gives a virtual upright image.
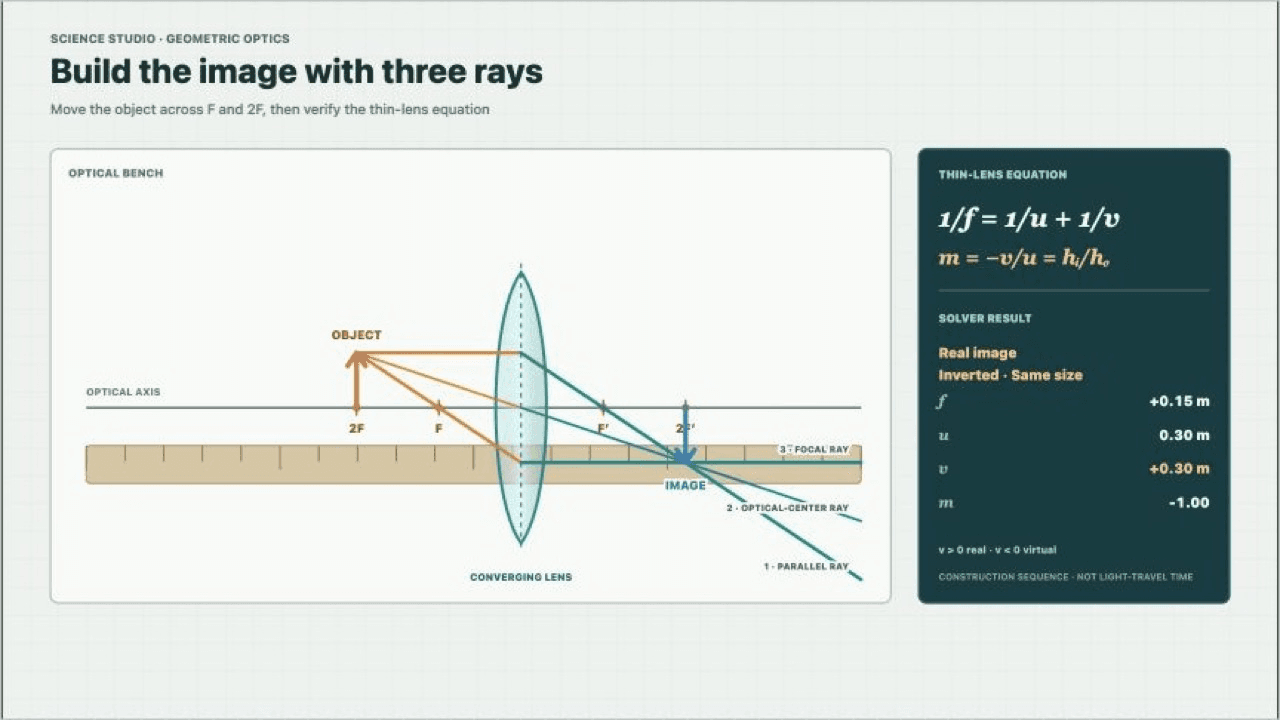
Students can use ray intersections to predict whether a converging lens forms a real or virtual image.
Trace the image before measuring it, then use the equation as a check.
- 1
Mark the focal points
Show the lens axis, focal points, and an object beyond twice the focal length. Ask students where the rays must meet after the lens.
- 2
Trace two principal rays
Use the ray parallel to the axis and the ray through the lens center. Their intersection determines the real image location.
- 3
Move toward the focal point
Keep focal length fixed and move the object inward. Students see the real image move farther away and grow as the object approaches the focal length.
- 4
Cross inside the focal length
Move the object inside the focal length. Extend the outgoing rays backward to locate the virtual upright image on the object side.
- 5
Compare screen evidence
Ask which image can be formed on a screen. Connect that test to whether real rays meet at the image position.
Make students explain the evidence, not just name the effect.
A converging lens always makes an enlarged image
Image size depends on object distance. A distant object produces a smaller real image, while a near object can produce a larger image.
A virtual image is not a real optical result
The rays do not physically meet at the virtual image, but the eye traces them back to an apparent source location.
The focal point is where every image appears
The focal point is where parallel rays meet. Image position depends on the object distance as well as focal length.
What the animation and measurements should agree on.
Object beyond focal length
The refracted rays meet on the far side of the lens, forming a real inverted image that can be projected onto a screen.
Object at focal length
The outgoing rays are parallel in the ideal model, so the image distance tends toward infinity.
Object inside focal length
The rays diverge after the lens; their backward extensions meet on the object side, forming a virtual upright image.
The lesson uses the principal-ray construction and thin-lens equation for an ideal converging lens.
OpenStax College Physics 2e, 25.6: Image Formation by Lenses. Have students locate the ray intersection first, then use the sign-aware equation to test the predicted image location and type.
Questions teachers can use before or after the demonstration.
When does a converging lens make a real image?
When the object is farther from the lens than its focal length, the refracted rays meet on the opposite side and form a real image.
Why cannot a virtual image be projected onto a screen?
The rays do not meet at the virtual image location. They only appear to originate there when traced backward by the eye.
Run the comparison in the interactive experiment.
Keep one visible question on screen, change one parameter, then pause when the diagram and measurements answer it together.