How to use interactive physics simulations on a classroom projector
Start from a still, readable question rather than a moving scene. Ask for a prediction, change one parameter, pause where the diagram and equation explain the result, and finish by naming the model assumptions.
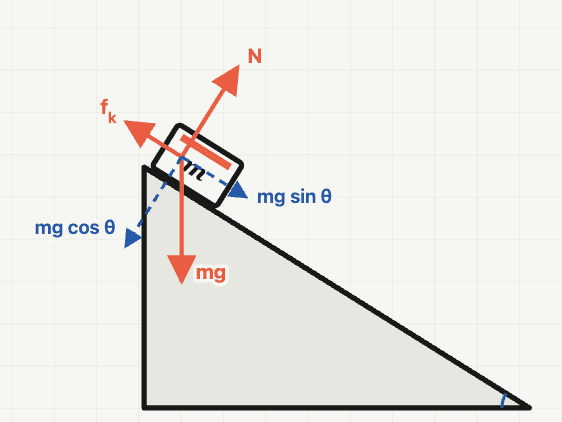
Students should know what to look for before anything moves.
Use the screen to pace an explanation, not to fill time.
- 1
Prepare one readable starting state
Open the simulation before students arrive, select a 16:9 canvas, fit it to the screen, and check that the smallest labels remain readable from the back row.
- 2
Show the question before the motion
Freeze the starting state and ask one prediction question. Students need time to inspect the diagram before animation competes for their attention.
- 3
Change one parameter
Adjust only the value named in the question. Keep the camera, units, and other parameters fixed so students can attribute the result to one cause.
- 4
Pause at the explanatory frame
Stop when the relevant vectors, measurements, or equation are visible together. Ask students to connect one visual change to one term in the equation.
- 5
Replay and name the model boundary
Run the comparison once more, then state what the simulation assumes or omits. Finish by asking whether the prediction still holds under those assumptions.
Three ways a useful simulation becomes visual noise.
Starting with animation
Movement attracts attention before students know what to observe. Begin from a still frame with a visible question.
Changing several controls
Multiple changes make cause and effect ambiguous. Lock the example, then vary only one parameter per comparison.
Treating the model as proof
A simulation shows the consequences of its model. It should support explanation and prediction, not replace measurement or a physical investigation.
What students should be able to do afterward.
Predict
State what should change before the simulation runs and identify the variable held constant.
Point
Locate the visual evidence, measurement, or vector that supports the result on the shared screen.
Explain
Connect the observed change to the relevant equation and state the assumptions under which the comparison is valid.
Prediction and guided questioning should frame the simulation.
This workflow follows the emphasis on learning goals, student reasoning, and active questioning in the University of Colorado Boulder's Teaching with PhET guidance. Science Studio adds a presentation-first sequence with synchronized diagrams, measurements, and equations.
Try the workflow with a free force diagram.
Set an angle and friction value, pause on the force decomposition, then ask students to predict whether the block will slide.